Showing posts with label Arduino. Show all posts

Thursday, November 13, 2014

Customized arduino

Create customized arduino for your project


  • In arduino uno there is special feature.
  • It is you can make your own arduino uno board for seperate projects.
  • I mean you don't need to buy seperate arduino board to seperate projects.

So how?
buy an atmeg 328p chip. (This is the main controlling chip of he arduino uno board.)
also buy 
             2 *22pf capacitors        
             1*16Mhz crystal          
             1*10K resistor             
             1* Push to on switch    
             1*28Pin IC base           


In black - Name of the pin of the IC
In red - Mapping name of the arduino board.

If you want to get digital out 13 's data then you have to get it via the 19 pin.


What is Arduino?


What is Arduino?

Arduino is an circuit which has ability to run custom Programs.

Now we can find many circuits from arduino family.
       Ex:-Arduino Mega,Arduino Uno, Arduino Nano etc.

Why it is popular?
        Because there are many modules which help to arduino.  Ex:- Arduino line following                        sensor,Ultrasonic sensor.. etc.
    So user can develop complex circuit even from small electronic knowledge..

      Note:- But Best programming skill gives best results.


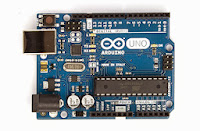
In my Tutorial I will Use arduino uno Rev3 circuit.


  1. First of all You have to download arduino IDE.

                Link:- Download IDE
                  Note:- I use 1.5.8 Version IDE.

   Steps are follows
         
Click I Agree Button

Click Next Button
Click Install Button

After it install begins

Note:- If system ask for install driver then press install.

After Complete it looks like this.


Installation verification steps.
Connect your arduino uno.
Open Arduino IDE.

Arduino pin description

Arduino pin description


In arduino we can see many type of pins.


White words will show name of the pin.

3.3V
       By using this pin you can get 3.3v out from  the arduino. (To power some external component)
5V
       By using this pin you can get 5v out from  the arduino. (To power some external component)
GND
      By using this pin you can get GND out from  the arduino. (To power some external component)
A0-5
     By using this pin you can put an analog iput to   the arduino.
0--Rx  - 
     Use to receive transmitting data from another component.
1-Tx 
     Use transmit data to another component
2-13 
     are digital pins.
           But you can see ~ mark is in front of some numbers.
              That means that pin is support to PWM feature. (We will discuss about it later.)

ON led
       When board receives power that light must go on.

Tx  and Rx Led 
        This led must light up when board is communicating.

DC power port 
        available to connect external power source to board. (You can power the board even without USB power supply.)

Reset switch - Use restart the program.


My First Program in arduino

Connect arduino. Aduino power led will light up.

Open the arduino and verify the port.(Tools-->port-->SELECT PORT)

Then Go to File -> Examples -> Basics -> Blink


After that you can see an a new program.


We will learn some features in arduino language in this section.
               Notation:- 
  •             //     anything type behind the // mark is not compiled. We say they are comment
  •           /*  */  Anything between  /* and */ is also comment.

                                    
What is void setup?
void setup() is a function.
         Mainly this function is use to setup pins.
           Means in arduino we must specify the pin status.(weather input or output)
          To setup the pin status we call another function called 
                                      pinMode(x,y)
         x=pin no
         y=status

pin no can be found by looking at the board.


In the board they name the pin in white colour.(See Arduino pin description page)

What is loop() function

              This is the section where our tasks must put in. and this code segment is run as a loop.(infinte loop)

digitalWrite(x,y)

x=pin no
y=value(in digital HIGH or LOW) High means it out +5v Low means it out 0V.

 once you set the value to HIGH or LOW it remain same as untill you edit the pin values again.

delay(x) is a function which can wait for x miliseconds. 

In this code you can check by putting any value to delay() function.

Now click on the right mark button in the top to compile.

When compiling you can see following message


 If your code does not make any compilation errors this message will come up.


Now click this button to upload your code in to the arduino board.

When code is uploading to your board Rx and Tx indicators are light up.
After that you can see one light in board is blinking.